

Adobe After Effects has been a staple in the world of video editing and motion graphics for decades. One of its most appealing features is the vast array of effects and plugins available for creating stunning visuals. One such effect is the CC Light Sweep, which, when used effectively, can give your video a polished and professional look. In this article we’ll go over the step-by-step process of using the CC Light Sweep Effect in After Effects. It doesn’t matter if you’re a beginner; by the end of this article, you’ll be equipped to use this effect like a pro.
What is the CC Light Sweep Effect?
Before we dive into the steps, it’s good to know what we’re working with. The CC Light Sweep Effect simulates a moving light source that sweeps across an object in your video or graphic, creating a highlight that’s animated. It’s particularly effective for emphasizing logos, titles, or any graphic element you want to pop or get a “shine” effect on.
Setting up your Project
Open After Effects and create a New Project and create a composition.
Choose your desired resolution and frame rate.
Import your assets: Drag and drop your media (like a logo or text) into the project panel.
Applying the CC Light Sweep Effect
- Drag your asset (text/logo/graphic) to the timeline.
- With the layer, that you want the light sweep effect on, selected, go to “Effects & Presets panel” and search for “CC Light Sweep”.
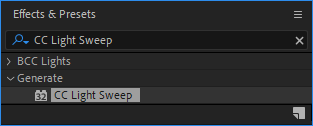
- Drag and drop the CC Light Sweep effect onto your desired layer.
Now, you’ll see the effect applied to your asset with a default light sweep.
Customizing the CC Light Sweep Effect
Under the “Effects Controls” panel, you’ll find several settings you can adjust:
- Sweep Intensity: Controls how bright the light sweep appears.
- Direction: Adjusts the angle at which the light sweep moves across your asset.
- Shape: You can choose between linear or circular sweeps.
- Edge Intensity: Modifies the brightness at the edge of the light sweep.
- Edge Thickness: Adjusts the thickness of the light sweep edge.
Play around with these settings to achieve the desired effect. For a beginner, I suggest experimenting to see what each adjustment does.
Animating the CC Light Sweep
To make the light sweep move across your footage, you’ll use keyframes:
- Move the playhead to the start of your timeline.

- In the “Effects Control” panel, next to “Center“, click on the stopwatch icon. This adds a keyframe.

- With the playhead still at the start, move the “Center” point to the left or right of your footage, to where you want the light sweep to start.
- Move the playhead further down the timeline to where you want the light sweep to end.
- Drag the “Center” point across your footage to its end position. After Effects will automatically add another keyframe.
Now, when you play your composition, you’ll see the light sweep move smoothly across your footage!
To open up all active keyframes select the footage and press U.
You’ll find more After Effects shortcuts in our Keyboard Shortcuts for After Effects article.
Fine-Tuning
Once you’re familiar with the basics, explore other settings like ‘Edge Color’ to add a tint or ‘Sweep Intensity’ to create a subtle or dramatic effect.
When you’re a bit more familiar with After Effects you can start Easy Easing the keyframes. This will give you a smoother result.
The CC Light Sweep effect in Adobe After Effects is a versatile tool that can bring a professional touch to your videos. By understanding its fundamentals and practicing the steps outlined above, even beginners can craft visuals that captivate the audience. Like any tool in After Effects, the key is experimentation.
